If you’re craving something both nutritious and indulgent, this Chocolate Chip Cookie Dough Protein Balls Recipe is just what you need. It’s perfect for a quick snack, a post-workout boost, or an anytime treat that feels a little like dessert without the guilt. I love making a batch on Sunday evenings to power me through the busy week ahead.

Jump to:
Why This Recipe Nails It
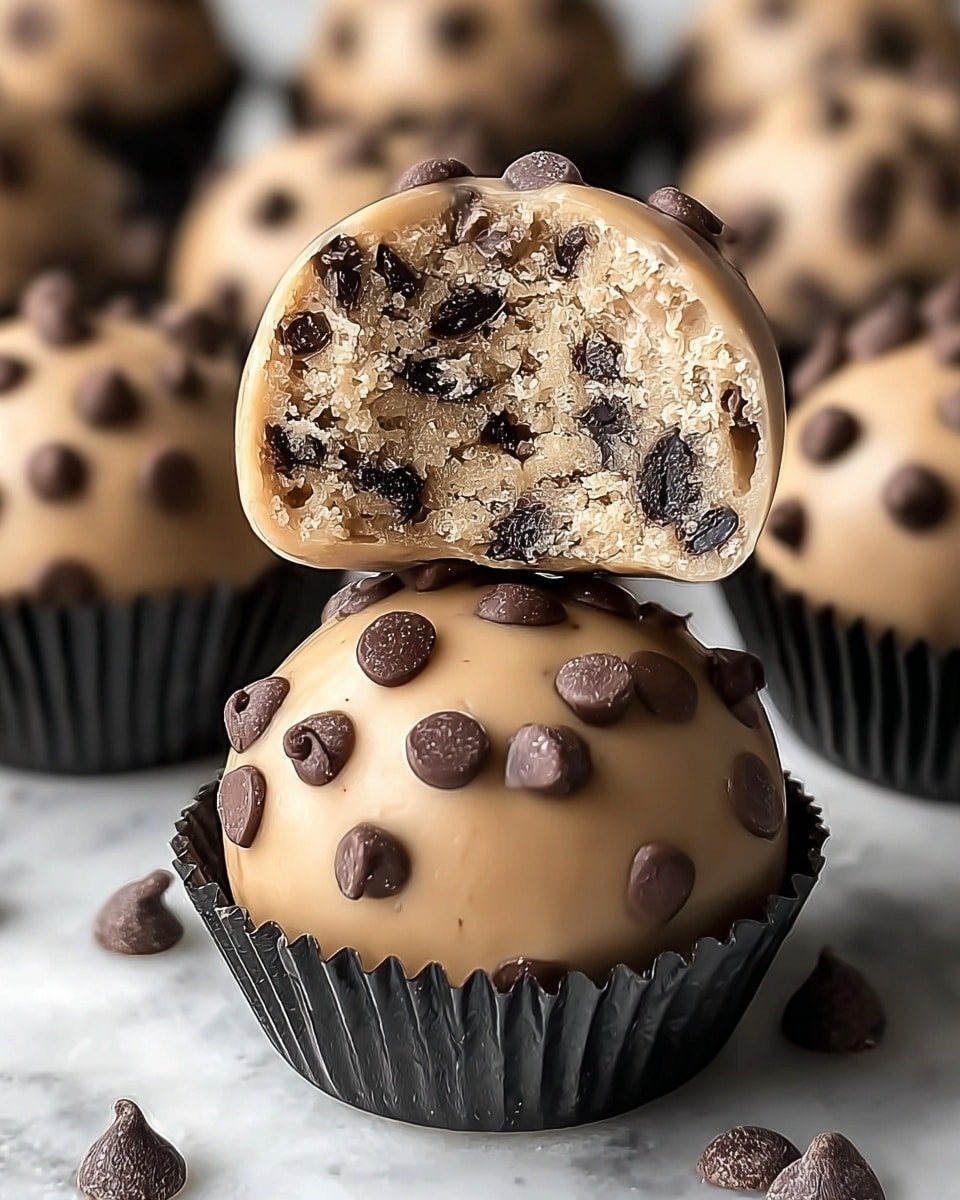
This recipe hits all the right notes by marrying the familiar nostalgia of cookie dough with the satisfying protein punch you want in a snack. The texture is spot-on—soft but firm, and the chocolate coating keeps things exciting, making every bite feel special.
- Fail-Safe Texture: The almond flour base plus a little milk creates a dough that holds up well without drying out.
- Layered, Balanced Flavor: Sweet vanilla protein pairs beautifully with natural nutty notes and melty chocolate.
- Everyday Pantry Wins: Uses common ingredients like nut butters and protein powder you probably have on hand.
- Quick to Crave-Worthy: From mix to fridge in under 10 minutes, then just a little chilling to finish.
Ingredient Game Plan
When making this Chocolate Chip Cookie Dough Protein Balls Recipe, choosing quality ingredients is key, especially the protein powder and nut butter. I always recommend fresh almond flour and a vanilla protein without too many additives for the best taste and texture.
- Almond flour: Look for finely ground and fresh to avoid any bitter aftertaste.
- Vanilla protein powder: Pick your favorite—whey, plant-based, or casein—all work well here.
- Cashew butter: Creamy and smooth for easy mixing, but almond or sunflower seed butter can be great swaps.
- Mini chocolate chips: Use mini for better distribution and melt-friendly texture in each bite.
- Milk (or non-dairy): Helps balance dough consistency without making it too wet.
Quick Note: Exact measurements are in the printable recipe card at the bottom.
Step-by-Step: Chocolate Chip Cookie Dough Protein Balls Recipe
Step 1 — Prep & Season
Start by whisking the almond flour, vanilla protein powder, and a pinch of salt together in a medium bowl. Mixing the dry ingredients thoroughly ensures each bite will have an even flavor and crumb. You'll notice the mixture is powdery but that’s exactly right here—no clumps allowed.
Step 2 — Build Big Flavor
In a separate bowl, stir your cashew butter with honey or maple syrup, vanilla extract, and 2 tablespoons of milk until smooth and glossy. This wet mixture is the secret to that luscious cookie dough feel. Once smooth, fold it gently into your dry ingredients. The dough should start to come together into a thick, sticky ball—if it feels dry, gradually add that last tablespoon of milk, just enough to bind it but not so much that it’s wet.
Step 3 — Finish for Perfect Texture
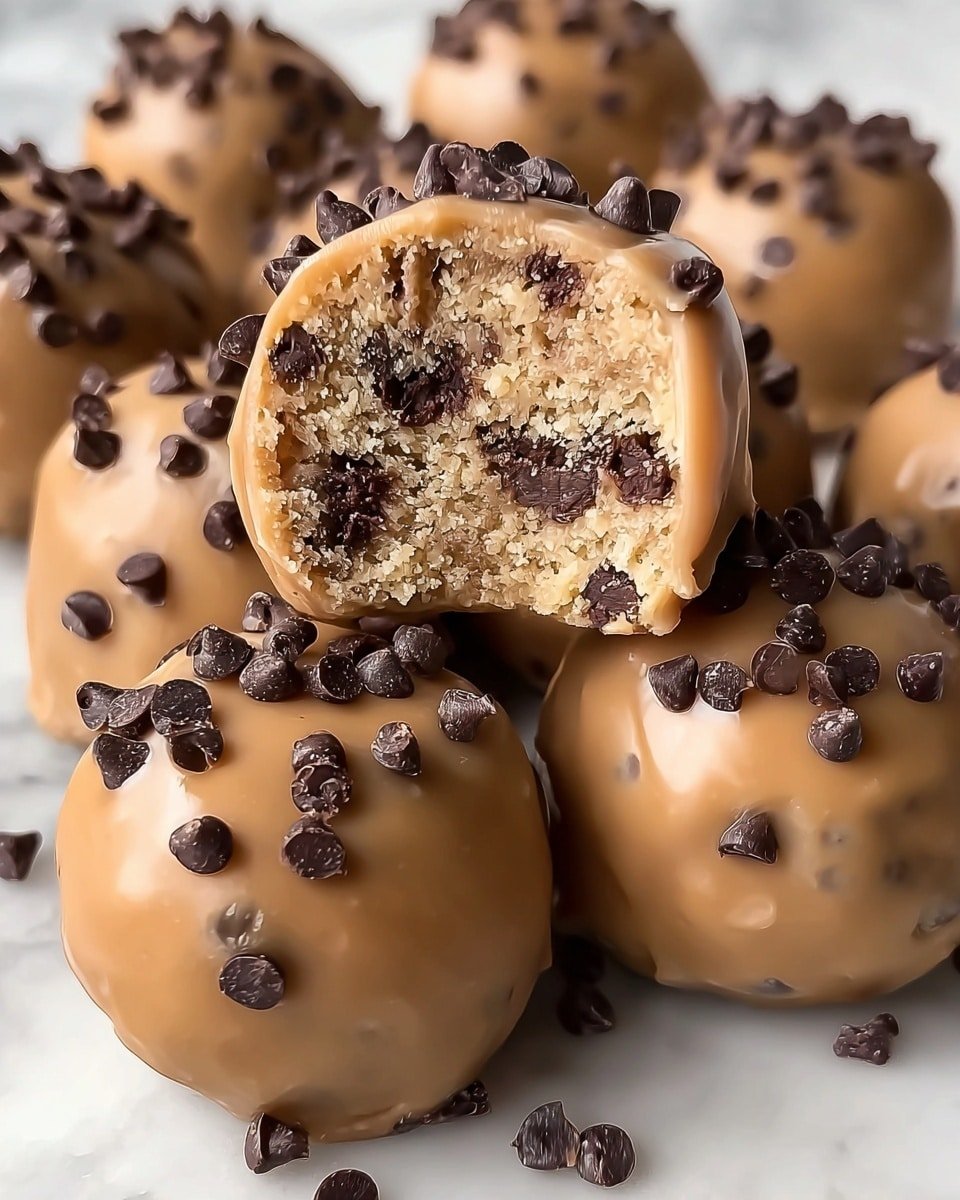
Next, fold in the mini chocolate chips carefully to distribute their glossy bursts throughout the dough. Roll the mixture into 1-inch balls, placing them on parchment paper. Pop them in the fridge for 30 minutes so they firm up nicely. While chilling, melt your chocolate chips with a bit of coconut oil in short microwave bursts, stirring between until silky smooth. Dip your protein balls fully or partially, tap off the excess chocolate, sprinkle a few extra chips on top, and let them chill again until the coating sets—about 15-20 minutes. That glossy finish is what gives these protein balls that irresistible look and texture.
Tiny Tweaks, Big Wins
Making these protein balls is forgiving, but a few tweaks can bring them to pro-level snack status. I learned early on that texture and timing make all the difference in achieving that perfect bite—never rush the chilling steps, and always adjust liquid slowly. A little patience turns good into great.
- Doneness Cue: Dough should be firm enough to hold shape but still moist and slightly sticky to the touch.
- Heat & Timing: Melt chocolate gently and stir often to avoid scorching; patience while chilling prevents melty messes later.
- Make-Ahead Move: Store chilled protein balls in an airtight container for ready-to-go healthy treats.
- Avoid This Pitfall: Don’t add too much milk at once—too wet dough won’t roll nicely or hold shape.
Serve It Best
Finishing Touches
I find a light sprinkle of flaky sea salt over the set chocolate coating really heightens the flavor, creating a perfect sweet-salty contrast. Alternatively, dusting lightly with cocoa powder or chopped nuts before chilling adds a gourmet touch and textural interest. These little extras elevate the snack without extra fuss.
Perfect Pairings
Chocolate Chip Cookie Dough Protein Balls pair beautifully with a hot cup of coffee or a creamy latte. For post-workout, I like to have them alongside a refreshing green smoothie to balance indulgence with freshness. The chewiness with a liquid cut through makes the experience delightfully satisfying.
Simple Plating Upgrades
For casual snacks, simply stack these glowing orbs on a pretty small plate. For parties, arrange them on parchment-lined trays sprinkled with edible flowers or chopped toasted nuts. Wrapping a few in parchment tied with baker’s twine makes a charming gift or lunchbox surprise. They look so inviting, your friends will be asking for the recipe.
Make-Ahead & Freshness
Storing Leftovers
Keep your Chocolate Chip Cookie Dough Protein Balls in an airtight container in the fridge to maintain their texture and freshness. They will keep well for up to a week, staying moist inside with a firm, chocolate snap outside. Just avoid stacking to prevent them from sticking together.
Freezer-Friendly Notes
These protein balls freeze beautifully, which is great when you want a stash on hand. Freeze them flat on a baking sheet first to prevent clumping, then transfer to a freezer-safe bag or container. When ready, thaw overnight in the fridge or for an hour at room temperature. The texture stays great without getting dry or crumbly.
Reheating Chocolate Chip Cookie Dough Protein Balls Recipe Without Drying Out
If you prefer them a little melty, microwave the protein balls in short 10-second bursts, checking often to keep cocoa glossy without overheating. For a slightly crisp shell, pop them in a preheated 300°F oven for 3-4 minutes—just keep an eye on them so they don’t dry out. The air fryer also works well: 2-3 minutes at 320°F gives a perfect warm center with intact chocolate coating.
Your Chocolate Chip Cookie Dough Protein Balls Recipe Questions, Answered
Absolutely! Swap honey for maple syrup and use a plant-based protein powder and dairy-free milk. Vegan chocolate chips are also widely available to complete the coating.
Add milk slowly, one teaspoon at a time, until the dough sticks together just enough to roll. It should be slightly tacky but not sticky or wet.
Yes, though the chocolate shell adds texture and a richer flavor. Without it, the balls are still tasty and easier to make for a quick snack.
Stored airtight in the fridge, they stay fresh and delicious for up to a week—perfect for weekly meal prepping.
Wrapping It Up
This Chocolate Chip Cookie Dough Protein Balls Recipe is my go-to for effortlessly delicious, protein-packed snacks. It blends wholesome ingredients into something that feels like a small celebration each time you bite in. I hope you enjoy making them as much as I do—they’re a proven crowd-pleaser, perfect for fueling your day with a little sweet happiness.
PrintFull Recipe
Chocolate Chip Cookie Dough Protein Balls Recipe

These Chocolate Chip Cookie Dough Protein Balls are a delicious and nutritious no-bake snack combining the flavors of classic cookie dough with the benefits of protein powder. Perfect for a quick energy boost or a healthy treat, they feature almond flour, protein powder, and a rich chocolate coating with mini chocolate chips on top.
- Prep Time: 15 minutes
- Cook Time: 0 minutes
- Total Time: 1 hour 5 minutes
- Yield: 20 balls
- Category: Desserts
- Method: No-Cook
- Cuisine: American
- Diet: Gluten Free
Ingredients
For the Cookie Dough Bites:
- 1 cup almond flour (or oat flour)
- ½ cup vanilla protein powder (whey, casein, or plant-based)
- ¼ cup cashew butter (or almond/sunflower seed butter)
- 2–3 tablespoon milk (dairy or non-dairy)
- ¼ cup mini chocolate chips (plus extra for topping)
- 2 tablespoon honey or maple syrup
- 1 teaspoon vanilla extract
- Pinch of salt
For the Chocolate Coating:
- 1 cup milk chocolate chips
- 1 teaspoon coconut oil (or vegetable oil)
Instructions
- Mix Dry Ingredients: In a medium bowl, whisk together almond flour, protein powder, and salt until evenly combined.
- Mix Wet Ingredients: In another bowl, stir cashew butter, 2 tablespoons milk, honey or maple syrup, and vanilla extract until smooth and well blended.
- Combine: Add the wet mixture to the dry ingredients, mixing thoroughly to form a dough.
- Fold in Chocolate Chips: Gently fold in the mini chocolate chips to evenly distribute them throughout the dough.
- Adjust Consistency: If the dough is too dry, add the remaining 1 tablespoon of milk or more, 1 teaspoon at a time, until the dough is slightly sticky but still firm enough to shape.
- Shape: Roll the dough into 1-inch balls and place them on a parchment-lined plate or tray.
- Chill: Refrigerate the dough balls for at least 30 minutes to firm up.
- Melt Chocolate: Microwave the milk chocolate chips and coconut oil in 30-second intervals, stirring between each until smooth and fully melted.
- Dip: Dip each protein ball into the melted chocolate, allowing excess chocolate to drip off before placing them back on the parchment.
- Sprinkle & Set: Sprinkle extra mini chocolate chips on top of each coated ball, then refrigerate for 15 to 20 minutes until the chocolate coating is set.
- Serve & Store: Enjoy the protein balls chilled. Store leftovers in an airtight container in the refrigerator for up to one week.
Notes
- Use almond flour for a gluten-free option, or substitute oat flour for a slightly different texture.
- Choose your favorite protein powder flavor; vanilla works best to complement the cookie dough taste.
- Adjust the milk amount carefully to achieve the right dough consistency; too much will make it sticky and hard to shape.
- For a vegan version, use plant-based protein powder, maple syrup instead of honey, and non-dairy milk.
- Ensure the chocolate coating is completely set before serving for best texture.
- Store in the fridge to keep the balls firm and fresh.
Leave a Reply